Cardboard Tricopter Build Plans
Josephine here,
This tricopter frame design is decently ridged, it’s not extremely crash resistant, but it does fine with a few hard landings. This is the first flying revision, so there is plenty of room for design improvements. Improve and share! Available under a creative commons ShareAlike-NonComm-Attrib license.
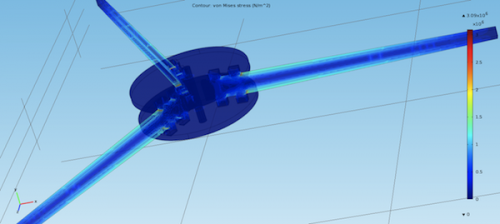 Von Mises stresses.
Source files here: 24cmTrV2.zip
You’ll also need a few build materials:
- Lasers, or a lot of time and a sharp knife.
- Glue: less is more!
- Itoya- O’Glue, school glue, etc.. some kind of water based glue
- Hot melt glue – hot glue gun
- CA glue – super glue
- 3.2mm rod, carbon fiber, fiberglass, wood, or a glue-able plastic
Arms are each made from 4 laminations of 3mm cardboard. To better resist bending, cut the outer two arm laminations parallel to the corrugation, and the inner two perpendicular.
Cut 5 base plates and 1 top plate. Three of the base plates will go on the bottom part of the frame, and the other two will combine with the top plate to make the upper part. For maximum durability, rotate each plate lamination 120 degrees so that the corrugations criss-cross when you glue them. You may need to adjust the motor mounts and servo profile in the tail arm to match your parts.
Total cut list:
- 4 arms parallel to corrugation
- 4 arms perpendicular to corrugations
- 2 tail arms parallel to corrugation
- 2 tail arms perpendicular to corrugations
- 5 base plates
- 1 top plate
- 1 set servo retainers – 1.4mm cardstock
- 2 motor mounts – 1.4mm cardstock
- 1 tail assembly top and bottom – 1.4mm cardstock
For the laminations use a moderate amount of water based glue – Itoya-O’Glue is nice. You could use spray adhesive too, but it’s $18/can.
Press:
Get two sheets of something really flat, i.e. some scrap acrylic sheet you have laying around. Sandwich your newly glued arms and plates between two of these flat sheets and put a good number of books and heavy things on top (~15kg). This will press the glue into any voids and keep your structural members straight as they dry. If you used the water-based glue, leave the arms to dry for about 24hrs, no peeking!
Frame:
Now that you’ve waited 24hrs for your parts to dry, retrieve them! As long as you were somewhat careful when you aligned the laminations, you should be able dry assemble your tricopter frame plates and arms. I start gluing the base plate and arms together with about 3mm gap between them- I squirt some hot glue into that gap and press the parts together. Work fast, hot glue works a lot better when it is hot!
Motor mounts:
Adjust the mounts to fit your motors. Mount your motors to the motor mounts, glue the mounts to the arms with hot melt glue.
Tail yaw assembly, the hard part:
Cut the rod to about 4.5cm or so and slide on your hinge parts, rotating them 180 degrees from each other. The hinge elements should rotate relatively easily but not be loose, or really stiff. Line up the rod flush with the first top tail plate hinge element. Line up your hinge elements with the tail hinge plate top and bottom. Make sure all the hinge elements are straight. Use CA to carefully glue hinge elements to the top and bottom, don’t get glue on the rod! Double check that everything is lined up and let the glue fully set. Now that the glue is set, double check that the rod is aligned with the first top plate hinge element. Carefully glue *only* the top hinge elements to the rod. Trim your servo horn so that its splined hub can fit on the front top hinge element co-axial with the rod, it might help if you sand away any surface features from the servo horn. Double check your alignment and glue the servo horn to the front plate. Allow the glue to set.
Make sure that the servo is centered by connecting it to a powered neutral RX channel.
Carefully partially test fit the hinge on the servo, don’t push it on all the way, I doubt it would survive removal from a snug shaft. Make sure that your hinge is co-axial with the servo splined shaft. You might need to add a shim to the bottom of the hinge or trim the arm a bit to make sure the hinge and servo are co-axial. Carefully fit the hinge hub onto the shaft. I use hot melt glue to glue hinge bottom to the tail arm.
Attach your electronics and go flying!
Additional Resources
Some tricopter fundamentals by David Windestål – http://www.rcexplorer.se
- http://rcexplorer.se/Educational/kkguide/kkguide/tri.html
- http://www.rcexplorer.se/projects/tricopterv25/tricopterv25.html
- http://www.rcexplorer.se/Educational/HKKK/HKKK.html
Josephine’s parts:
| Thing | weight(g) | quan | total weight(g) | sub price | price | Notes | Links |
|---|---|---|---|---|---|---|---|
| Orange 6 chan RX | 9.9 | 1 | 9.9 | 5.99 | 5.99 | de-case, and use heat shrink to save weight | http://www.hobbyking.com/hobbyking/store/uh_viewItem.asp?idProduct=11965 |
| servo metalGear | 14.5 | 1 | 14.5 | 4.67 | 4.67 | http://www.hobbyking.com/hobbyking/store/uh_viewItem.asp?idProduct=17322 | |
| servo Plastic | 9.9 | n/a | 0 | n/a | 0 | plastic might work. | |
| kk-board | 14.6 | 1 | 14.6 | 14.99 | 14.99 | You will also need a programmer to reflash this with the tricopter firmware. Most any iscp 6 pin will do. | http://www.hobbyking.com/hobbyking/store/uh_viewItem.asp?idProduct=19534 |
| esc | 9.8 | 3 | 29.4 | 9.47 | 28.41 | Maybe buy an extra | http://www.hobbyking.com/hobbyking/store/uh_viewItem.asp?idProduct=2161 |
| motor + hardware | 20 | 3 | 60 | 10 | 30 | Get at least one extra | http://www.hobbyking.com/hobbyking/store/uh_viewItem.asp?idProduct=8140 |
| 5030Prop (ccw) | 1.5 | 6 | 9 | 1 | 6 | Get a few extra, especially if you don’t have experence flying dynamically unstable rotor craft, ie, collective pitch helicopters | http://www.hobbyking.com/hobbyking/store/uh_viewItem.asp?idProduct=10033 |
| male-male JR | 1.8 | 4 | 7.2 | 1 | 4 | http://www.hobbyking.com/hobbyking/store/uh_viewItem.asp?idProduct=21758 | |
| tur 1300 | 123.2 | 1 | 123.2 | 10 | 10 | Order from domestic HK warehouse, need at least 25C rate, 1000mAh - 1600mAh | http://www.hobbyking.com/hobbyking/store/uh_viewItem.asp?idProduct=20822 |
| EstAirframe3ply | 50 | 1 | n/a | n/a | 0 | ||
| Actual4plyFrame | 60 | 1 | 60 | 1 | 1 | standard corrugated cardboard, nominal thickness 3mm, density 166.7 kg/m^3 (50mg/cm^2 - one 3mm sheet) | |
| Frame glue | 5 | 1 | 5 | n/a | 0 | Low-mid temp hot melt glue | |
| CompositLayer glue | n/a | n/a | n/a | n/a | 0 | Itoya- O’Glue, might switch to contact adhesive, $18 | |
| CA - Glue | n/a | n/a | n/a | n/a | 0 | Servo retainer/ tail tilt hinge assembly glue | |
| HK EMS shipping | n/a | 1 | n/a | 30 | 30 | ||
| Est. Totals | 332.8g | $135.06 | |||||
| Actual Weight | 357g |