Paper Robots, Part 3
One of the often overlooked, and rather important steps in discovering a novel solution to a problem, is getting it wrong the first half dozen times. It helps inform the design process later, and allows one to not worry so damn much about the current state of affairs. Other things that help that process along are not worrying about it costing too much, or being too emotionally invested in the outcome because you’ve already spent so much money that you can’t stop now. This is something that organizations and individuals seem to struggle with.
 Progress.
To that end, I’ve been trying to figure out ways to make experimenting with robots cost less. Optimizing for multiple iterations, instead of getting it right the first time, as it where.
As I’ve written about in the past, cost can be measured in many ways. For this exercise I’m primarily interested in cost of materials, cost of manufacturing, and assembly time. Design time isn’t particularly optimized here, but as we build on previous iterations, hopefully we can stay ahead of complexity.
 "Manufacturing time is a factor, so please pay attention."
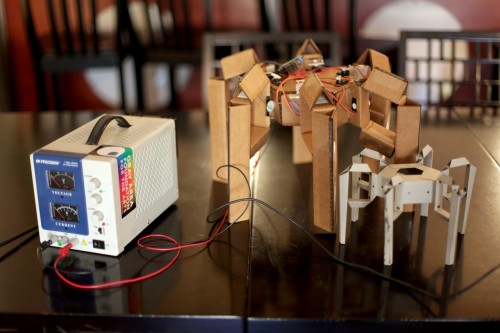
On the cold hard cash front, I think I’m doing pretty well. This little fellow consists of: $1.00 in cardboard, $54.60 in servos, and $29.95 in servo controllers. Plus some odds and ends like a power supply and a laptop. Which, if you’re reading this, you probably already posses. If your budget is especially tight, you could probably even “borrow” the necessary gallon of rubber cement, 24 paper clips, and 6 yards of packing tape from the office. Tell them its “for robots”. Anyway, cost is important to me. Mostly because I’m currently unemployed, and while I enjoy spending money like a drunken sailor, it does tend to cut into my savings more than I like.
So, how well does a cardboard 12-DOF robot work? Pretty well, I’m happy to say. I finished setting it up on the kitchen table last night and some friends and I made some really basic motion tests. The main area for improvement is the hip joint. Instead of making them out of paper, I made them out of tape. This probably would have been okay if I hadn’t run out of structurally sound filament tape mid way through. The clear packing tape I replaced it with is absolutely terrible for hinges, and most of the legs are starting to come off. It’s okay, we can repair them.
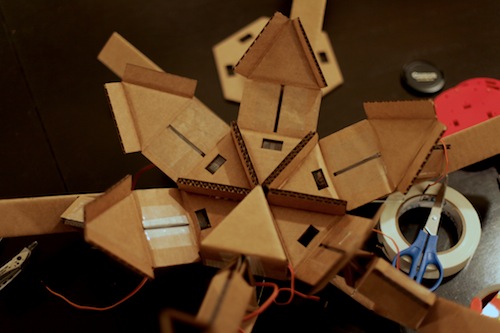
There are a bunch of areas where things could be improved. The way the body segments go together is a little hokey. It’s extremely rigid and strong, (holds a large DSLR quiet nicely), but the process of gluing it together is tricky and requires a bit more patience than I want to be known for. Also, toxic glue. I currently use rubber cement because its strong, flexible, and dries fast, but I could do with out the smell.
 "You're in the desert, you see a robot lying on its back, struggling, and you're not helping— why is that?"
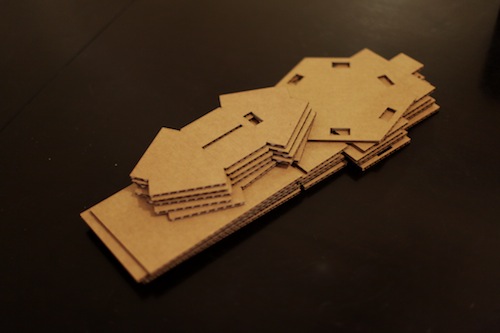
You can see how the segments fit together here. For the next revision, the top and bottom plates will likely be slotted to help align them. I should probably also make some allowances for controller mounting. We had a good time getting the little bot to walk in circles, tying its umbilical cord up around its feet. Cable management in high servo count machines becomes a problem quickly if you don’t design for it up front.
The other thing that becomes obvious, is that 12 degrees of freedom is not really enough for a six-legged, symmetrically shaped robot. The plane of motion for the front/back sweep is an arc, and the feet drag quite a bit in anything other than circular gaits.
Still, it’s fun to play with, and if you’de like to make your own it shouldn’t be too difficult. You’ll need a printer for patterns and an x-acto knife, or a laser cutter, to cut out the cardboard. Have an irrational fear of x-acto knives & don’t have a lasersaur? Your local hackerspace may be able to help you out. Here in the bay area there is the excellent Noisebridge, and Tech Shop. On the east cost check out NYC Resistor. There are many others.
You’ll need a sizable chunk of cardboard to get started. Here’s the flat-pattern as a PDF file. It’s CC-NonCom-ShareAlike licensed for your remixing pleasure. It’s also half baked, as the hip joints aren’t quite done yet. An exercise left to the reader, as it where. For servos I use the Corona DS 939MG. For the drivers, I can say enough nice things about Pololu. I have the 18 channel version of there driver, as well as some of their other products. They’re all very well thought out and documented. They go the extra mile and even have a cheesy little desktop controller app for bootstrapping the process of animating 18 channels. On that note, you may want to pick up a little step down voltage converter and Arduino if you don’t have a bench supply and you want to go wireless.
After that, it’s software the whole way down. Then it’s turtles.