A Moderately Priced Solution
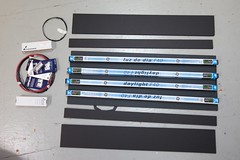 Parts And Pieces.
We’re living in a golden age for indie film making at the moment. The cost of capturing high quality video is dropping rapidly. Between the Red One, Canon’s 5D MarkII, and the Panasonic GH1, high-def cameras with interchangeable lenses have gone from nearly unobtainable to moderately affordable in the span of a year. Unfortunately, a lot of the other tools for film making haven’t adjusted for the changing market landscape yet. One of these areas is in lighting.
Having good lighting is obviously very important for photography and film, something I have found reflected in the pricing of modern studio gear. A professional soft light set up can cost almost as much as the camera. So, after researching the available options I decided it would be a lot more fun to make my own fixtures.
Industry standard Kino-Flo fluorescent soft lights cost around $1000 a piece. About two thirds of that is the cost of the ballast. These are the power supplies that drive the fluorescent fixtures. Fluorescent tubes, like LEDs need a regulator to keep from drawing too much current and burning out. The Kino-Flo power supplies are designed for some serious abuse and long life, which is a big part of there cost. We don’t need those extra features, so that’s where we’ll be cutting corners.
In making my own fixture I wanted to get as close as possible to the form and functionality of a Kino-Flo, at a cost of around $150, including the tubes. Naturally there where going to be some trade-offs.
I started with some surplus black 1/2” gator board. Gator board is like a stiffer version of foam core. It’s more expensive, and for this project, not actually necessary. If I’d been able to find 48” long black plastic corrugated sign board I probably would have used that. The only part of the fixture that is going to weigh anything is the power supply, which is going to be attached to the baby-receiver if possible. A baby receiver is the 3/8” lug mounting plate that goes into the end of a C-Stand. You can make much, much less expensive stands from various other hardware store parts, but I personally find that the C-stand is one of those devices where it’s cost and its utility are well matched.
Using some aluminum right angle strips to mount the florescent tube holders also served to stiffen the the edge, and to give the side baffles something to bend against. Finally, using black gaffers tape to create the hinges, a baby receiver plate for the C-stand mount, and zipties to hold the power supply in, the final light is a reasonable balance between price and functionality.
A few things I learned along the way:
- Use T-8 tubes. They’re more efficient, and the power supplies are easier to find in 4 tube versions.
- Reflective tape or tinfoil and spray tack glue will make a very nice reflector surface.
- Put an inline power switch in your cord, it will get used a lot more often than you think
- The first one you build isn’t gonna be that nice, go slowly and do it right the second time.
- Those power supplies are very high voltage, be careful!!
That’s all for now!